
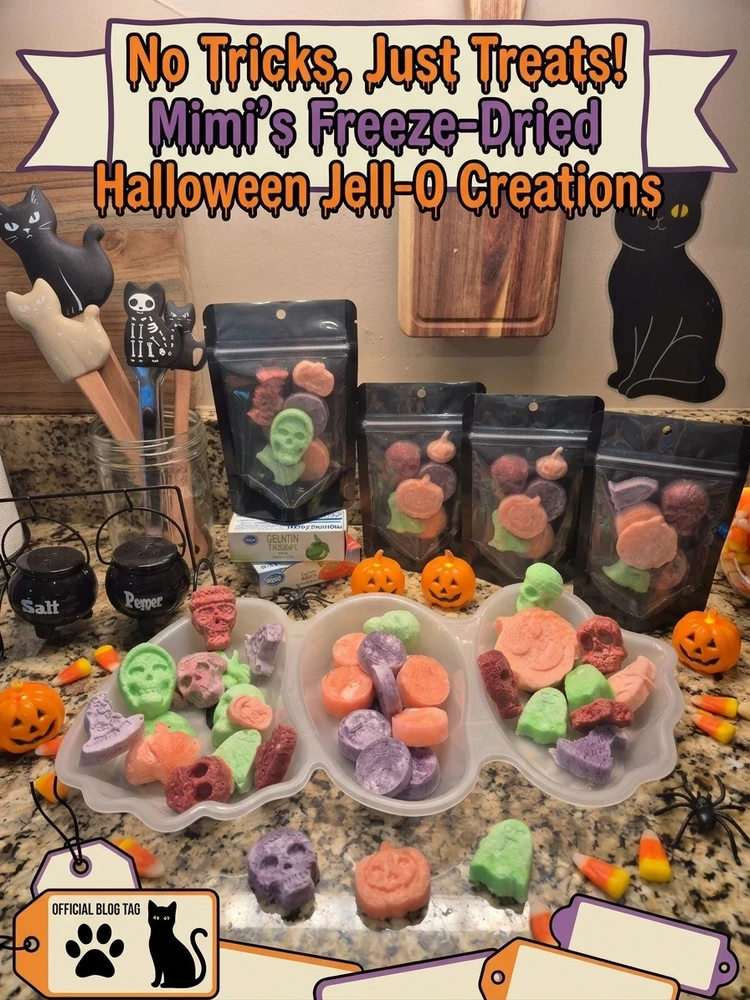
No Tricks, Just Treats! Mimi's Freeze-Dried Halloween Jell-O Creations
Posted by Mimi on Oct 16th 2026
No Tricks, Just Treats! Mimi's Freeze-Dried Halloween Jell-O Creations
From jiggly little ghosts to crunchy skulls, Halloween just got a whole lot sweeter!
Boo!
It's officially spooky season, and you know what that means at Mimi's house!
The Halloween decorations are coming out, the freeze-dryer is working overtime, and my kitchen is turning into a laboratory of deliciously spooky experiments!
This year, I've been having entirely too much fun making freeze-dried Jell-O treats in Halloween silicone molds. We're talking little green ghosts, purple skulls, orange pumpkins, witches' hats, and all sorts of creepy-cute creations.
And the best part? These aren't your ordinary wiggly, jiggly Jell-O treats.
Oh, no!
Once they've spent some quality time in my freeze-dryer, they transform into light, airy, crunchy little Halloween surprises!
No tricks. Just treats. And maybe a little mad-scientist laughter coming from Mimi's kitchen!
From Jiggly to Crunchy: The Halloween Magic
I've always loved experimenting with my freeze-dryer, especially when it comes to creating fun treats for the grandkids and family.
Halloween gives me the perfect excuse to pull out those adorable silicone molds I've collected over the years.
Skulls? Check!
Ghosts? Absolutely!
Pumpkins, witches' hats, spiders, and black cats? Bring them on!
What makes these treats so much fun is watching how the Jell-O changes during freeze-drying.
As the frozen water is removed, the gelatin and sugar mixture can puff up, creating a delicate, airy, crunchy texture.
The colors are wonderful, and each batch comes out with its own personality.
Some of my little skulls look downright spooky. Others look like they're smiling at me!
And that's part of the fun.
Mimi's Spooktacular Freeze-Dried Halloween Jell-O Treats
What You'll Need
-
Several flavors of regular, full-sugar Jell-O (not sugar-free!)
-
Water according to your chosen gelatin recipe
-
Halloween-themed silicone molds
-
Measuring cup or small pouring pitcher
-
Baking sheets to support the molds
-
Freezer
-
Home freeze-dryer
-
Parchment paper, if desired
-
PackFreshUSA Small Black-and-Clear 5-Mil Stand-Up Pouches
Mimi's Spooky Flavor Combinations
One of my favorite things about making these treats is playing with all the different colors.
Lime Green: Perfect for ghosts, monster faces, and creepy little creatures.
Orange or Peach: Wonderful for pumpkins and other Halloween shapes.
Grape: My favorite for spooky purple skulls, bats, and witches' hats.
Cherry, Raspberry, or Strawberry: Great for creepy red skulls and frightfully fun treats.
I love combining several colors and flavors into one package. The assortment looks fantastic against the black background of our stand-up pouches!
Mimi's Tip: Stick with Regular Jell-O!
Now, here's something I learned from my own freeze-drying experiments!
Not all Jell-O is created equal when it comes to freeze-drying!
I've found that traditional, full-sugar Jell-O gives me much better results than the sugar-free varieties.
And believe me, I've experimented!
When making my peach Halloween treats, I even tried mixing regular Jell-O and sugar-free Jell-O in a 50/50 combination, hoping I'd get similar results.
Unfortunately, those didn't turn out nearly as well as my treats made with regular Jell-O.
The sugar in traditional Jell-O plays an important role in how the mixture behaves during freeze-drying. Sugar-free varieties have different ingredients and can produce a very different finished texture.
In my experience, regular Jell-O gives me that wonderful expanded, airy, crunchy result I'm looking for.
My recommendation? Stick with traditional, full-sugar, store-bought Jell-O or a comparable regular gelatin dessert mix.
Sometimes experimenting teaches us what works, and sometimes it teaches us what NOT to do!
And that's exactly why I share these little kitchen adventures with you.
After all, I'd rather do the experimenting so you can enjoy the treats!
Mimi's motto: If you want that spooky, puffy crunch, regular Jell-O is the way to go!
Step-by-Step: Making Your Spooky Jell-O Creations
Step 1: Prepare Your Jell-O
Start by preparing your regular, full-sugar flavored gelatin.
You can follow the package directions or use a firmer gelatin mold recipe if your particular shapes need extra support.
If using a modified recipe, test a small batch first because changing the gelatin or water content can affect how the treats expand during freeze-drying.
Mimi's Tip: Place your silicone molds on a baking sheet before filling them.
Trust me, carrying a floppy silicone mold full of liquid Jell-O across the kitchen is an adventure nobody needs!
Step 2: Fill Those Spooky Molds
Carefully pour your gelatin mixture into your Halloween silicone molds.
I love making several flavors at once so I can create a colorful assortment.
Make sure the gelatin gets into all those little details. Those tiny skull faces, pumpkin smiles, and ghostly expressions make the finished treats extra fun.
Refrigerate until completely set.
Step 3: Into the Freezer!
Once your gelatin has set, carefully remove the shapes from the molds and arrange them on a tray.
Freeze until completely solid.
Pre-freezing makes handling the shapes easier and helps them maintain their shape before the freeze-drying process begins.
Don't worry if some of your little creations aren't perfect.
It's Halloween! A slightly crooked skull just adds character!
Step 4: Let the Freeze-Dryer Work Its Magic!
Arrange your frozen Jell-O shapes in a single layer on your freeze-dryer trays.
Leave a little space between them because these treats can expand during the process.
Use a suitable cycle for sugary gelatin treats according to your freeze-dryer manufacturer's instructions. Since sugar-rich foods can puff, foam, or become sticky, a small test batch is always a good idea.
Now comes the hardest part.
Waiting!
Once the freeze-dryer finishes its cycle, check your treats carefully.
Break open a few of the thicker pieces to make sure they're completely dry inside.
If you find any cold, gummy, or moist centers, they need more drying time.
Mimi's Tip: I frequently add extra dry time to my freeze-dried treats. I've learned that moisture is not our friend when it comes to keeping things crunchy!
Step 5: The Crunch Test!
Now comes my favorite part!
The taste test!
Your once-wiggly Jell-O shapes should have transformed into light, crunchy little treats.
Some will puff up dramatically, while others hold their spooky little shapes beautifully.
And a few might look like they escaped from a mad scientist's laboratory!
That's perfectly fine with Mimi.
Halloween treats aren't supposed to be boring!
Packaging the Spooky Fun with PackFreshUSA
Now, you know I couldn't make all these adorable treats without finding the perfect packaging!
For this Halloween project, I'm using PackFreshUSA's Small Black-and-Clear 5-Mil Stand-Up Pouches.
And let me tell you, they're practically made for Halloween!
The black exterior creates a wonderful spooky backdrop, while the clear window lets everyone peek at the colorful ghosts, pumpkins, and skulls inside.
I absolutely love how the green, purple, orange, and red treats stand out against the black packaging.
They look like something you'd find in a little Halloween candy shop!
Why I Love These Pouches
Black-and-Clear Design: The perfect Halloween combination! The black makes the colors pop, and the clear window shows off those adorable spooky shapes.
Stand-Up Gusset: Makes displaying your Halloween treats easy. Whether you're setting them on a party table or arranging little gifts, they stand up beautifully.
Resealable Zipper: Convenient for opening and closing the pouch when enjoying the treats.
Heat-Sealable Top: Allows you to add a protective heat seal above the zipper after filling.
Perfect Little Size: Wonderful for individual treat assortments, Halloween party favors, and small seasonal gifts.
Small Stand-Up Pouch Dimensions
-
Outside Dimensions: 4 × 6 × 2.5 inches
-
Inside Dimensions: Approximately 3 × 4 × 2 inches
-
Thickness: 5 mil
-
Style: Black-and-Clear Stand-Up Pouch with Resealable Zipper
The small size works wonderfully for a handful of freeze-dried Jell-O shapes, depending on how much your treats puff up.
And let's face it, some of those little skulls can get pretty big once they're freeze-dried!
Find our packaging at PackFreshUSA.com.
Mimi's Packaging and Storage Tips
One thing I've learned through years of freeze-drying is that moisture can ruin a perfectly good batch of crunchy treats.
Freeze-dried foods can absorb moisture from the air surprisingly quickly.
Here are a few things I recommend:
Make Sure They're Completely Dry: Check the centers of thicker treats before packaging.
Package Promptly: Once the treats are completely dry and ready for packaging, don't leave them sitting out where they can absorb humidity.
Heat Seal for Extra Protection: Our stand-up pouches can be heat-sealed above the zipper.
Store in a Cool, Dry Place: Keep your packaged treats away from direct sunlight, heat, and humidity.
Choose Packaging for Your Storage Goals: These black-and-clear pouches are wonderful for displaying Halloween treats, but windowed packaging generally doesn't provide the same moisture, oxygen, and light protection as fully metalized Mylar.
For longer-term storage, I prefer fully metalized Mylar bags and an appropriate storage method for the particular food.
For these Halloween creations, I'm making fun seasonal treats intended to be enjoyed rather than tucked away for years.
And if your family is anything like mine, they probably won't last very long anyway!
Five Fun Ways to Package Your Halloween Jell-O Treats
Here's where you can really let your imagination run wild!
1. Monster Mash Mix
Combine green ghosts, purple skulls, and orange pumpkins in one black-and-clear pouch.
It's a Halloween party in a bag!
2. Witch's Potion Crunch
Use grape and lime flavors for a spooky purple-and-green combination.
Add a label that says "Witch's Potion — Crunchy Edition!"
3. Pumpkin Patch Treats
Fill a pouch with orange pumpkin shapes and add a little pumpkin sticker.
Perfect for fall festivals or Halloween gatherings.
4. Boo-tiful Bites
Create little bags filled with colorful ghosts.
These make adorable party favors or gifts for friends and family.
5. Mimi's Mystery Monster Mix
Mix several different flavors into each pouch and let everyone guess what they're eating.
Are you brave enough to try the purple skull?
Don't worry, it's probably grape!
Halloween Treat Labels: Let's Get Creative!
If you're packaging these for gifts or parties, a fun label can make them even more special.
Here are a few of my favorites:
-
Mimi's Monster Crunch
-
Boo-tiful Bites
-
Spooky Skull Snacks
-
Witch's Potion Crunch
-
Pumpkin Patch Puffs
-
Ghostly Goodies
-
Frightfully Fruity Crunch
-
No Tricks, Just Treats!
A cute Halloween sticker, some purple ribbon, or a little gift tag can turn an ordinary treat pouch into something special.
If you're selling packaged treats, remember to follow applicable food labeling, allergen, and cottage-food or commercial food regulations.
A Little Halloween Fun from Mimi
One of my favorite things about freeze-drying is that it lets me take ordinary foods and turn them into something completely unexpected.
Who would have thought a few boxes of Jell-O, some silicone molds, and a freeze-dryer could create such adorable Halloween treats?
And when they're all tucked into their little black-and-clear stand-up pouches, they look like something you'd find in a spooky candy shop.
I love experimenting with new recipes, trying different flavors, and discovering what works and what doesn't.
Sometimes the results are fantastic.
Sometimes they're a little questionable.
And sometimes, like my 50/50 peach Jell-O experiment, they remind me why the original recipe works best!
But that's the beauty of experimenting.
You learn something new every time.
Whether you're making treats for the grandkids, putting together Halloween party favors, or simply having fun with your freeze-dryer, remember that half the fun is seeing what happens next.
And if one of your little skulls comes out looking a bit crooked?
Well, it's Halloween!
A little creepy is exactly what we're going for!
So grab your favorite Jell-O flavors, pull out those Halloween molds, and get ready for some spooky freeze-drying fun.
And remember...
No tricks. Just treats!
Until next time, keep your treats crunchy, your Mylar sealed, and your Halloween full of sweet surprises!
Hugs, giggles, and spooky little crunches!
Mimi
Your favorite Mylar-loving, freeze-drying grandma at PackFreshUSA
P.S. If you hear strange noises coming from Mimi's kitchen, don't worry. It's probably just me testing another batch of crunchy Halloween goodies!
Food Safety Reminder: Freeze-drying does not sterilize food. Always use safe preparation and handling practices, verify that treats are thoroughly dried, and choose packaging appropriate for your intended storage period. Shelf life should not be assumed without testing.